

One easy way to waste an air-sealing weekend is to caulk hairline cracks around the windows while the large holes into the attic stay open. Two others are sealing a house tight without checking the gas appliances first, and counting on a federal tax credit that, per the IRS, no longer covers 2026 work. This guide is built around those mistakes and the official guidance that avoids them.
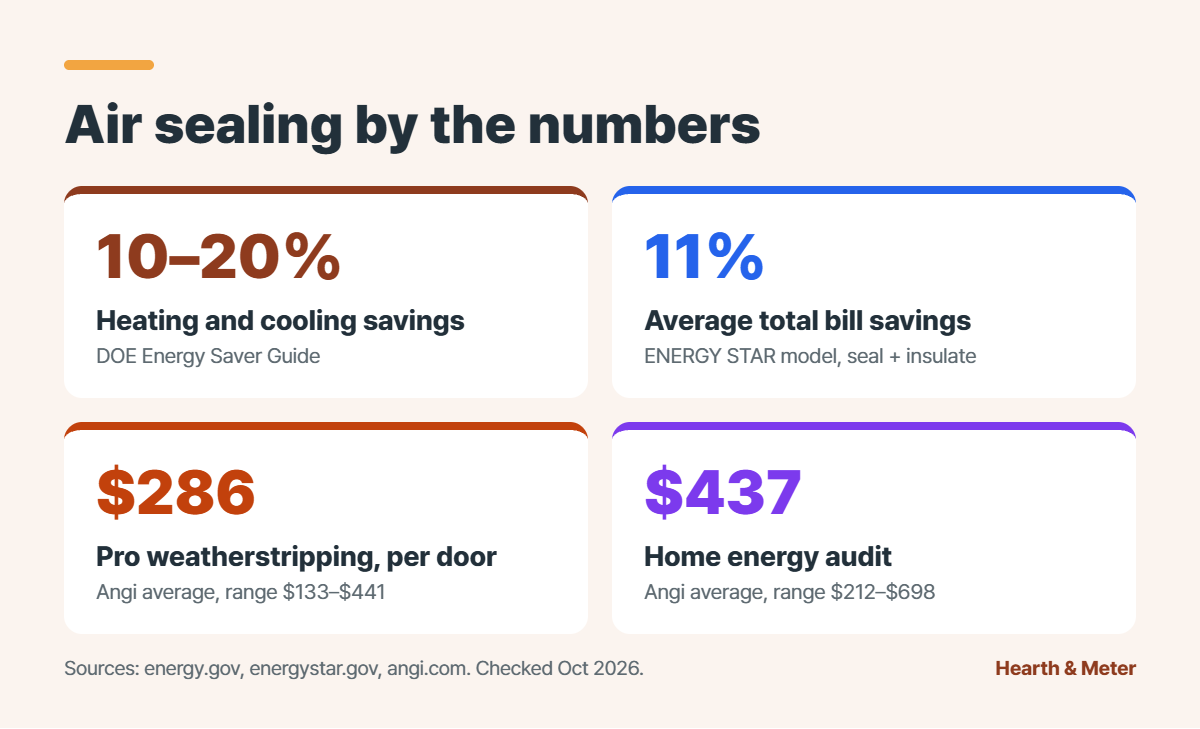
Cold air sliding under the front door, a bedroom that never warms up, a furnace that cycles more than it did last winter: these usually trace back to air leaking through the shell of the house. When you learn how to seal air leaks in your home before heating season, you find that most of the work needs caulk, foam, and weatherstripping rather than a contractor. The Department of Energy’s Energy Saver Guide says sealing uncontrolled air leaks can save 10% to 20% on heating and cooling bills.
This guide is for owners and renters of typical existing houses. It covers finding leaks without special equipment, the order to fix them in, what each job costs in 2026, and which parts belong to a contractor. Savings estimates and tax-credit status were checked against energy.gov, ENERGY STAR, and IRS pages on October 18, 2026. It does not cover wall insulation retrofits, new construction, or moisture and mold problems. If you are still estimating this winter’s bill, start with our winter heating bill outlook for 2026–27.
What sealing air leaks saves and costs in 2026
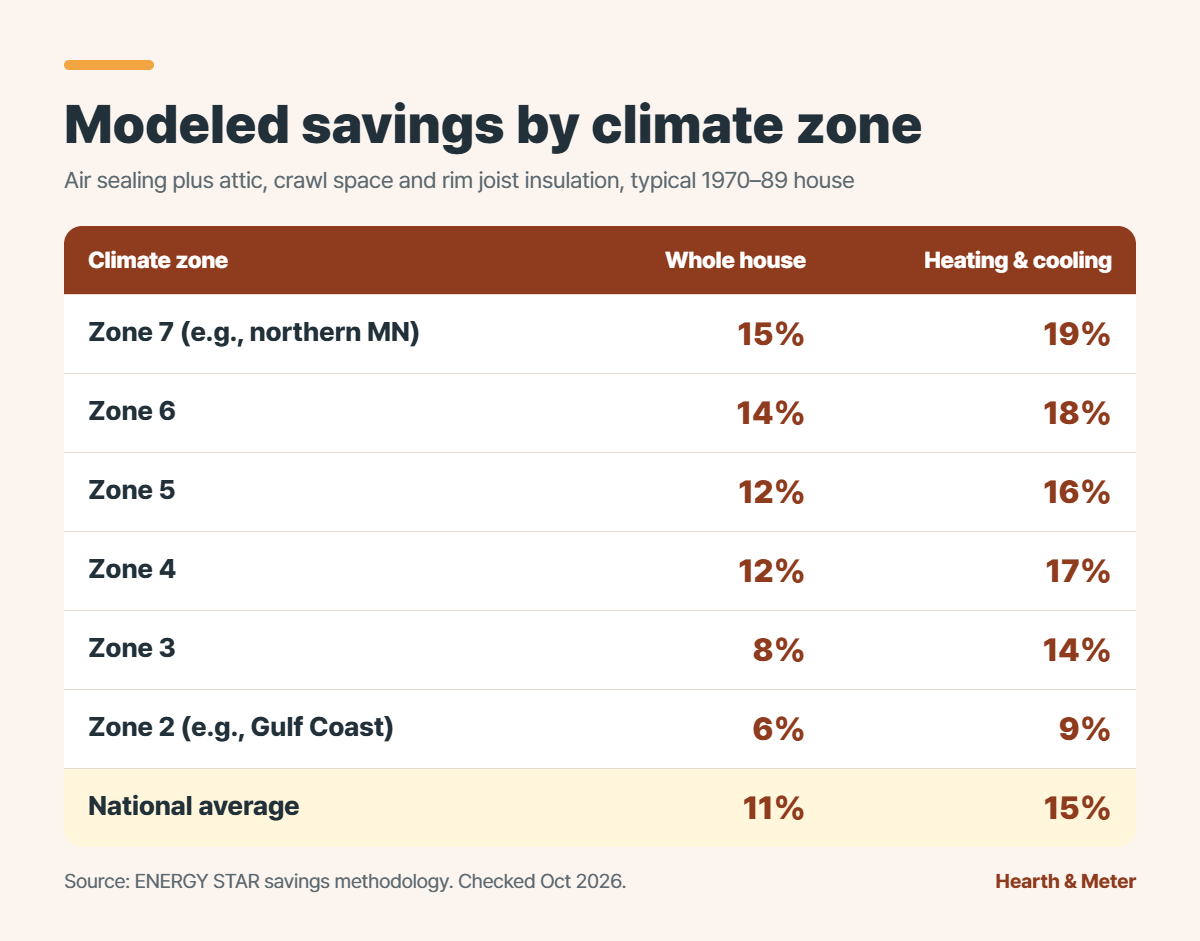
ENERGY STAR’s savings methodology estimates that sealing air leaks and adding insulation in attics, floors over crawl spaces, and basement rim joists saves an average of 15% on heating and cooling, or 11% on total energy costs. That figure comes from modeling a 1,700 sq ft house built between 1970 and 1989, with sealing that cuts air infiltration by 25%. Colder places gain more. The modeled whole-house savings are 15% in climate zone 7 (northern Minnesota, for example) and 6% in climate zone 2 (the Gulf Coast).
Here is what the common jobs cost, grouped by where the work happens. Treat these as national ranges from cost surveys, not quotes.
- Doors: pro weatherstripping runs $133 to $441 per exterior door (average $286), a door sweep $45 to $100 per door installed, and adhesive foam tape $35 to $80 per door installed, per Angi, updated Sep 23, 2026.
- Windows: pro weatherstripping costs $50 to $150 per window, per HomeAdvisor, updated Jun 19, 2026.
- Attic: professional attic air sealing runs $250 to $750, per Angi, updated Jul 15, 2026.
- Energy audit: $212 to $698 (average $437), with a blower door test adding $100 to $300 and a combustion safety test adding $75 to $200, per Angi, updated Oct 8, 2026.
Door size and material move the door price the most. Double and French doors need more strip, and Angi adds $150 to $350 when the threshold or frame needs repair first. Local labor rates explain most of the gap between the low and high ends of every range.
Mistake: starting before the four safety checks
- Vermiculite in the attic. It looks like pebbly, pour-in fill, usually gray-brown or silver-gold. The EPA says to assume it may contain asbestos, leave it undisturbed, and never remove it yourself.
- A house built before 1978. Pulling window or door trim disturbs paint that may contain lead. Read the EPA lead renovation guidance first, or leave trim work to a lead-safe certified contractor.
- Knob-and-tube wiring. This pre-1930 wiring can become a fire hazard when insulation is in contact with it, according to ENERGY STAR. Have an electrician look at it before anyone works around it.
- Fuel-burning appliances. A gas, oil, or propane furnace, boiler, or water heater that vents naturally can pull exhaust back into the house once the house gets tighter.
Safety first: ENERGY STAR recommends having a contractor test fuel-burning appliances for proper drafting before and after you seal. CPSC advises CO alarms on every level of the home and outside sleeping areas. If you suspect CO poisoning, get outside to fresh air immediately, then call 911.
If your furnace has not been checked this season, book that first. Our furnace tune-up checklist lists what the technician should test.
How to seal air leaks in your home, in the right order
Work from the easy, visible leaks toward the attic. Most of the list is DIY work; you can stop after step 6 and hand the attic to a pro.
- Sketch the house and list suspects. ENERGY STAR’s attic air sealing guide starts with a floor sketch. Mark dropped soffits over kitchen cabinets and bath vanities, slanted ceilings over stairs, and every spot where a wall meets the ceiling. Add exterior doors, windows, the attic hatch, outlets on outside walls, and pipes under sinks.
- Find leaks on a windy day. DOE suggests holding a lit incense stick or smoke pen near windows, doors, outlets, ceiling fixtures, and the attic hatch. If the smoke stream travels sideways, you found a leak. For windows, ENERGY STAR’s paper test works too: close the sash on a sheet of paper, and if it slides out easily, the seal could be tighter. Mark each spot with painter’s tape.
- Weatherstrip doors and windows. Replace flattened or torn strips. Foam tape is the cheapest material but wears out fastest. Tubular rubber and silicone hold up better on exterior doors, and a door sweep closes the gap at the bottom. The door should still latch without a shove.
- Caulk small gaps, foam bigger ones. ENERGY STAR matches the material to the gap: silicone or acrylic latex caulk for openings 1/4 inch or less, expanding spray foam from 1/4 inch to 3 inches. Behind window and door trim, use non-expanding foam made for windows and doors so the frame does not bow. Target places where plumbing, ducts, or wiring pass through walls, floors, and ceilings.
- Gasket outlets and switches on exterior walls. DOE lists foam gaskets behind outlet and switch plates as a standard fix. Turn the circuit off at the breaker before removing a cover plate, and leave anything inside the box to an electrician.
- Close up the fireplace. Check that the damper shuts fully. DOE notes that an inflatable chimney balloon can seal an unused flue and deflates within seconds if a fire is lit by mistake. Gaps around chimneys and furnace or water heater vents need fire-resistant materials such as sheet metal and furnace cement, so hire that out if you are unsure.
- Tackle the attic, or hire it out. This is the hardest job on the list, rated difficult by ENERGY STAR and estimated at one to three days for a homeowner. Dirty, darkened insulation shows where house air is escaping. Plug big openings first: dropped soffits, open wall cavities, kneewalls, plumbing vents, wiring holes, and the hatch. Building codes usually require 1 inch of clearance from metal flues and 2 inches from masonry chimneys, sealed with aluminum flashing and high-temperature caulk, never spray foam.
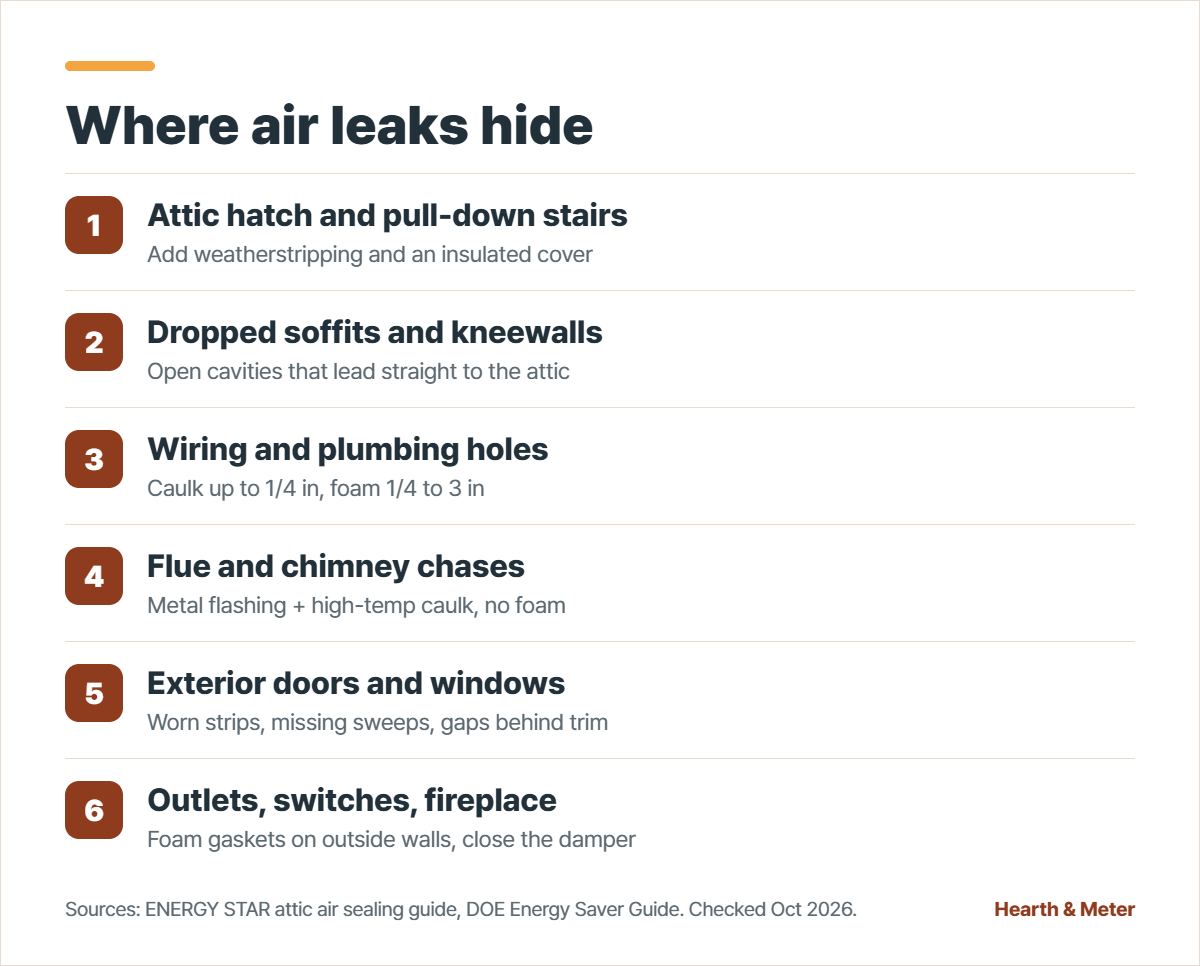
Seal the big holes first. ENERGY STAR’s attic guide says your biggest savings come from plugging large openings like dropped soffits and kneewall cavities, so do not spend a weekend on hairline cracks while those stay open.
If water pipes run along drafty outside walls or the basement rim joist, our frozen pipe prevention checklist covers what to seal and insulate there before the first hard freeze.
Mistakes that waste the effort once you start
- Spraying foam around a furnace or water heater flue. ENERGY STAR says not to use spray foam there; that gap gets aluminum flashing and high-temperature caulk.
- Sealing the attic while a bath fan or dryer still vents into it. ENERGY STAR treats vents that dump moist air into the attic as a problem for a pro to correct before any sealing.
- Stepping between joists. Ceiling drywall will not hold your weight, so stay on joists or truss chords.
- Forcing backer rod or thick weatherstripping into a gap until the window or door frame bends and stops closing properly.
- Skipping the radon test. After you reduce air leaks, EPA recommends testing your home for radon.
Attic air leaks also feed ice dams: warm air melts roof snow, and the meltwater refreezes at the eaves, where clogged gutters make the backup worse. If gutters are on your fall list too, see what gutter cleaning costs.
The fix for ice dams starts with these same attic leaks, ahead of gutters or heat cables; our guide on how to prevent ice dams on your roof covers the order of that work and what each option costs.
For the whole season, our winter home maintenance checklist shows where air sealing fits: after the heating tune-up and before freeze prep.
Air sealing usually comes right before adding insulation, since one attic visit can cover both. To size that second job, see how much attic insulation you need by climate zone.
Air sealing checklist before the first cold snap
- Check the attic for vermiculite and knob-and-tube wiring before you climb in.
- Get fuel-burning appliances checked, and confirm a CO alarm works on every level.
- Do a smoke or paper test on a windy day and tape every leak you find.
- Weatherstrip exterior doors and windows; add a sweep where you see daylight under a door.
- Caulk gaps up to 1/4 inch; foam gaps from 1/4 to 3 inches.
- Add foam gaskets behind outlet and switch plates on exterior walls.
- Shut the fireplace damper or seal the flue when not in use.
- Plug the big attic bypasses first, or get two written quotes for pro attic sealing.
- Call your utility about assessment and air sealing rebates.
- Test for radon once the work is done.
When to call a pro instead
ENERGY STAR says to bring in a professional before attic work if you find any of these: a cramped attic that is hard to move around in, wet insulation that points to a roof leak, moldy or rotted rafters, kitchen, bath, or dryer vents that exhaust into the attic instead of outdoors, or little to no attic ventilation. Roof leaks and rotted framing are separate repairs that come before sealing.
A home energy audit is the other route. In DOE’s description, the auditor does a “test in” with safety and air leakage tests, contractors make the fixes, and a “test out” checks the results. A blower door depressurizes the house so leaks you cannot feel become easy to find. Questions worth asking when you call:
- Are you certified through one of the DOE-recognized auditor programs, such as BPI or RESNET?
- Will you run a blower door test before and after the sealing work?
- Do you test combustion appliances for drafting and CO after the house is tighter?
- Can you give me a written scope that lists each location you will seal and anything excluded?
- Does my utility offer a free or discounted assessment through you?
Myth: the federal credit still pays for 2026 air sealing
Air sealing used to come with a federal tax credit, which is where the confusion starts. The federal Energy Efficient Home Improvement Credit (25C) covered 30% of insulation and air sealing material costs, plus up to $150 for a qualifying energy audit. The IRS page for the credit now says it applies to improvements made through December 31, 2025. Work you do in 2026 does not qualify under that rule. DOE’s home upgrades page still mentions a 30% credit for home energy assessments, but the IRS page is the one that governs your tax return.
Local money is more likely. Many utilities offer rebates for professional assessments and air sealing, according to ENERGY STAR, so call yours before you buy materials. You can also search the ENERGY STAR Rebate Finder and DSIRE by ZIP code. Income-eligible households can apply for the Weatherization Assistance Program through their state, which can pay for air sealing and insulation.
Before you spend anything, wait for a windy evening, light an incense stick, and walk the exterior doors and windows with a roll of painter’s tape. Then count the taped spots. If most are at doors and windows, a few hours with weatherstripping and caulk will cover them. If the worst drafts come from ceilings, the attic hatch, or rooms under the attic, get an energy audit quote and compare it with Angi’s $212 to $698 range.
Related guides: Winter heating bills 2026–27 · Furnace tune-up checklist and cost · How to prevent frozen pipes
This article is general information, not professional advice. Hire licensed contractors for gas, electrical, roof, and HVAC work, and check local codes and permit rules before you start. Costs are national survey ranges as of the dates shown; your quotes will vary.
Leave a Reply