

To prevent ice dams on your roof, keep the whole roof deck cold: seal attic air leaks first, then add insulation and keep the eave vents open.
Gutters, heat cables and roof rakes deal with the ice after it forms. The heat that starts the problem comes up from the rooms below, and the work that stops it happens indoors, where it can be done this month, before the first snow lands. This guide walks through the myths that send homeowners to the wrong fix, the attic work that addresses the cause, and what each option costs.
Why ice dams form on one part of the roof
The University of Minnesota Extension puts the condition plainly: an ice dam needs snow on the roof while the upper part of the roof surface averages above 32°F and the lower edge stays below 32°F. Snow melts over the warm section, the water runs down, and it freezes again at the cold eave. The ridge of ice grows, water pools behind it, and that water finds its way under shingles and into the attic, walls or ceiling.
The warm section is almost always warmed by the house. UMN says that in many homes the biggest single path is warm air leaking through ceiling openings into the attic, with heat conducted through thin insulation coming second. Ducts in the attic, a chimney that runs warm from a wood stove, and kitchen or bath exhaust that ends just above the roof add to it. The DOE Building America Solution Center notes that ice dams can start with as little as 2 inches of snow on a poorly sealed, poorly insulated roof.
Myths that send money to the wrong fix
Each belief below treats the eave, where the ice shows up, instead of the attic, where the heat comes from. Extension and energy-agency guidance addresses every one of them.
Myth: clogged gutters cause ice dams
A full gutter can freeze solid and make the edge heavier, but the dam itself forms on the roof surface because of uneven roof temperatures. HomeGuide’s ice dam FAQ says removing gutters will not stop ice dams, and the UMN explanation never mentions gutters as a cause. Clean them for drainage in the fall (our gutter cleaning cost guide has the price ranges), then look upstairs for the real cause.
Myth: heat cables prevent ice dams
Heat cables melt a channel so water can drain, and HomeGuide says heated gutters work while they are plugged in and used properly. They do nothing about the warm attic, so ice can still build between the zigzags. The Center for Energy and Environment in Minneapolis goes further and tells homeowners not to use heating cables to eliminate or prevent ice dams, citing wear on the roof and the cost to run them. The cost section below works out that running cost for a hypothetical house.
Myth: a new roof or ice-and-water shield stops them
Codes require a self-sealing membrane along the lower part of the roof in new houses, and it is a good backup. Natural Resources Canada is clear about its limit: the membrane keeps water from leaking through the sheathing, but ice dams still form and can still damage shingles and gutters. A reroof only solves the problem if the attic air sealing and insulation are fixed at the same time.
Myth: piling on more insulation solves it
Insulation slows heat that conducts through the ceiling. It does little against warm air rising through an unsealed can light or attic hatch, because air moves through fluffy insulation. UMN’s order is explicit: make the ceiling airtight first, then consider more insulation. If you are adding insulation anyway, our attic insulation guide with R-values by climate zone covers the target depths.
Myth: icicles are harmless
UMN notes that sun alone occasionally creates the warm-top, cold-edge pattern. A row of thick icicles along a heated part of the house deserves more attention: the DOE Solution Center describes icicles as a common sign that more water is backing up behind a dam, where it can be pulled under the shingles by capillary action.
Myth: chipping the dam off fixes it
NRCan warns that attacking ice dams every winter with an axe or ice pick damages the roof surface, and the Minneapolis energy center says not to get on the roof to break one apart. Even a successful chip job leaves the warm attic in place, so the dam rebuilds after the next snowfall.
How to prevent ice dams on your roof, from the attic out
The DOE Solution Center lists three moves in order of importance: air seal the ceiling, insulate the attic, ventilate the roof. Here is what each one means in an existing house.
Seal the ceiling first. The leaks that matter most are the ones that carry warm air straight into the attic. The DOE list includes wiring holes, recessed lights, plumbing stacks, flues and chimney chases, attic hatches and pull-down stairs, exhaust fan housings, top plates and drywall seams. The chart below groups them. Many of these are caulk-and-foam jobs, and our guide to sealing air leaks without the common mistakes covers which materials go where. The gaps around a metal flue or chimney need noncombustible materials and code clearances, so leave those to a pro.
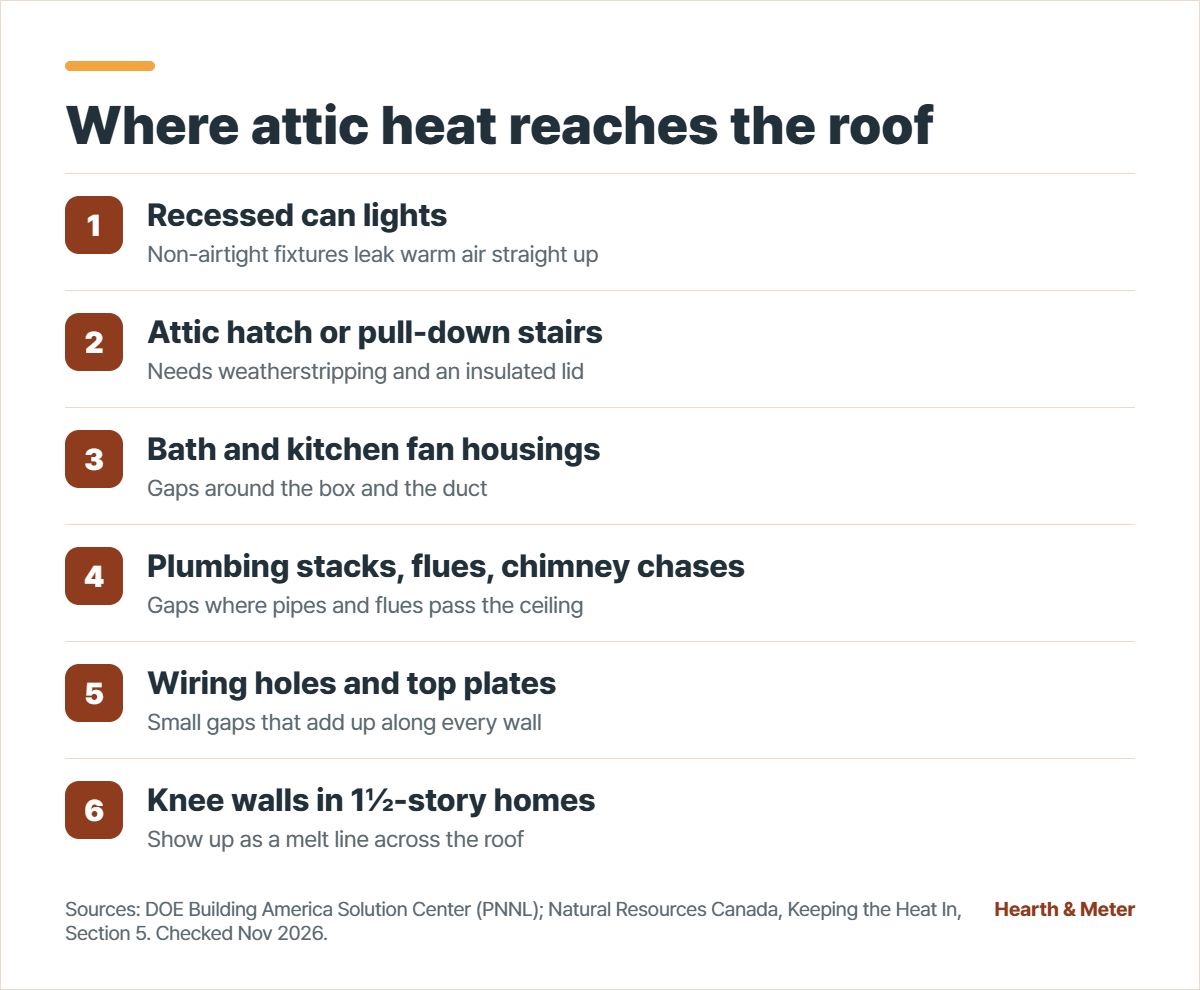
Then insulate, all the way to the edge. NRCan points out that many attics have little room for insulation where the ceiling meets the outside wall. With a baffle in place, as little as 4 inches may be left there, and the snow just above the overhang melts first. The Solution Center calls for baffles that keep insulation out of the soffit vents and leave an air gap of at least 2 inches under the roof deck. In 1½-story homes with knee walls, the Minneapolis energy center says enough insulation often will not fit, so sealing does most of the work and some ice risk remains.
Keep the roof vented. For peaked roofs over accessible attics, NRCan uses a ratio of 1 square foot of unobstructed vent area per 300 square feet of insulated ceiling, ideally half at the soffits and half at the ridge or gables. It also says vents will not solve problems created by air leakage, which is why they come last.
Move heat sources out of the attic where you can. Bath fans should end outdoors, not in the attic. UMN notes that exhaust ending just above the roof can melt snow and may need to be extended in snowy areas, and that leaky, poorly insulated ductwork in the attic warms it too. Duct sealing in an attic is an HVAC contractor’s job when the system is gas-fired.
One caution before tightening the house: UMN reminds homeowners that combustion appliances and exhaust devices need enough air to run safely after the house is sealed. If you heat with gas, oil or wood, ask the contractor for a combustion safety check after air sealing. UMN also suggests hiring a weatherization contractor who runs a blower door test and uses an infrared camera to find the leaks.
What each ice dam fix costs, side by side
This table puts the prevention and removal options next to each other, using the most recent dated figures we could find. National averages hide a wide spread, so treat them as a starting point for quotes.
| Option | What it changes | Typical cost | Source (date) |
|---|---|---|---|
| Air sealing + attic insulation | Removes the heat that melts the snow | $1,000–$4,500 per project (Minnesota quotes) | Center for Energy and Environment (Mar 2023) |
| Roof heat cable, installed | Keeps a drainage path open; ice can still form | $5–$15 per linear foot; $500–$2,000 typical total | HomeGuide (Nov 7, 2025) |
| Running a heat cable | Electricity while plugged in | $40–$200 per month | HomeGuide (Nov 7, 2025) |
| Roof rake (tool) | Pulls snow off the lower roof from the ground | $40–$120 | HomeGuide (Nov 7, 2025) |
| Roof snow raking service | Same, done by a crew | $200–$500 per visit | HomeGuide (Oct 17, 2025) |
| Steam removal of a dam | Clears an existing dam | $800–$2,400 per job | HomeGuide (Oct 17, 2025) |
Here is how the cable math works for a hypothetical house with a 50-foot eave on its problem side and a 12-inch overhang. HomeGuide’s length table uses a 2.8 multiplier for that overhang on a standard roof, so the zigzag needs about 140 feet, plus 50 feet if the gutter is heated too: 190 feet in all. At $5 to $15 per foot installed, that is $950 to $2,850.
A constant-wattage cable such as Stelpro’s SCRG is rated at 5 watts per foot, so 190 feet draws 0.95 kW whenever it is on. Left on around the clock for 60 days, that is 1,368 kWh. At the EIA U.S. average residential price for August 2026, 18.16 cents per kWh, the bill comes to about $248, or about $235 at Minnesota’s 17.20 cents. A controller that held the cable to 8 hours a day would cut that to roughly $83. None of those dollars changes the attic.
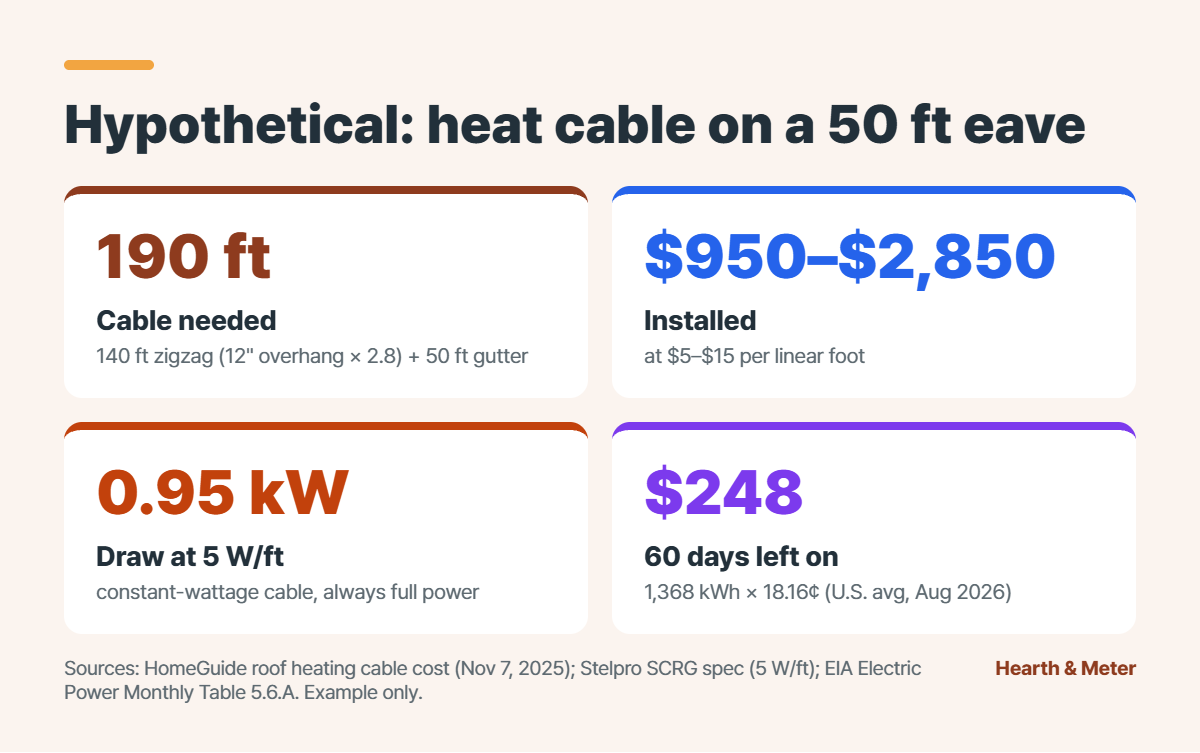
Put next to the Minnesota quote range for air sealing and insulation, a few winters of cable electricity and one steam visit can cover much of the cost of the fix that removes the cause. The attic work also lowers the heating bill every month of the season.
If the ice is already there, and what to check after the first snow
A dam that is already leaking
UMN lists two short-term moves: remove snow from the roof so there is less to melt, and in an emergency, cut channels through the dam so trapped water can drain. It also says anyone working on the roof in winter, or on the roof from below, risks injury, and that professionals should do the job. HomeGuide describes low-pressure steam as the method pros use to avoid damaging shingles. Inside, UMN says to dry wet areas right away and not to repair ceilings or walls until they are dry, and to fix the heat loss at the same time or the damage comes back.
Safety first: stay off snowy or icy roofs and never rake snow from a ladder. OSHA says to keep yourself, the pole and the rake at least 10 feet from any power line and to treat every line as energized, including the service drop to your house. Do not chip, axe or pressure-wash a dam. Hardwired heat cables, new outdoor circuits and anything done at roof height belong to a licensed electrician or roofer.
Your first-snowfall check
NRCan describes a free diagnostic: look at the roof after the first heavy frost or light snow, note where it melts first, and find out what sits under that spot. A horizontal melt line across a 1½-story roof usually marks the knee walls. Bare patches above a bath fan, plumbing vent, skylight or attic hatch point to those leaks.
- The morning after the first light snow, walk around the house and photograph each roof face from the ground.
- Mark every bare patch or stripe on the photo and write down what is directly below it inside.
- Look for stained or discolored insulation near those spots on your next attic trip, which NRCan names as a telltale sign of air leakage.
- Bring the photos to a weatherization contractor and ask for a blower door test, so the quote targets the leaks the snow already showed you.
Related guide: our winter home maintenance checklist puts this attic work in order with the other jobs that come due before the first freeze.
This article is general information, not professional advice. Hire licensed contractors for roof, electrical, gas and HVAC work, and check local codes and permit rules before changing insulation, ventilation or wiring. Cost ranges are national averages from the dated sources cited and vary by region.
Leave a Reply